X69 Cabrio

  • Click here to become an Official Member of BMW Club Malaysia Download Form
Got this fixed today and it cost me RM900 inclusive of labor at Sam Cabrio @ Selayang


Also I have the the broken plastic cover replaced
Parts cost me RM800 however managed to nego to a more reasonable price since it was broken my a famous workshop at Jln Ipoh. If possible I will not have him touch my car in future.


E
ver since I got my DICE and iphone, am looking for a way to mount it as OEM as possible in my car. Managed a quick DIY

RM 7 - micro suctions map http://www.world-of-accessories.co.uk/images/user/33-200812123927.jpg
RM 2 - CF sticker
FREE - Old Hotel Key Card (May replace it with metal)


Found the DIY guide

[h=1]DIY > Convertible Top Interior Trim Flap Repair (E46)[/h]Posted by Admin in DIY | 0 comments

top1-32082_140x140.jpg
Jan 16, 2009
Background:
My wife and I purchased our 2001 BMW 330ci Convertible (sport/premium/HID) in July 2007. At some point approximately 3 months after owning the vehicle, we noticed that the rear passenger’s side flap of interior trim had freed itself from the plastic trim piece that holds it flush to the top when it’s up. This area of the vehicle, in a coupe/sedan, could be described as the vehicle’s passenger’s side C pillar. Unfortunately, we have no idea what caused it to break free.
Issue:
The following pictures detail the issue at hand:
top1.JPG

top6.JPG


In both pictures, you will notice the top of the plastic piece is broken. This plastic piece normally extends approximately another 2-3″ upwards (see picture of new piece in following section) and has on it another attachment string. Somehow, this string was pulled off of the plastic piece forcefully.
Please note that the holes in the fabric were caused by this sharp-edged plastic piece poking through when the top was put up and down a few times before repair. If you experience this issue, do not put your top up or down until you repair it or your interior will likely suffer the same fate.
Before I embarked on my repair, I made sure to get a quote from a local trim shop that the local BMW dealer recommends. The quoted cost of repair was $367.00, not including the BMW parts! I was shocked. Although I have never owned a convertible before this vehicle, I saw the damage as minor and nowhere near $374.00 worth of labor. Boy was I right! That quote is nothing short of highway robbery.
With that, on to the repair.
Materials Needed:
The materials for this repair are impressively low. Here is everything you will need for the ENTIRE repair:
- BMW Part No. 54-31-7-135-351 – $128.40 (www.getbmwparts.com)
- VERY SHORT Torx T20 screwdriver – $3.99 (Sears)
- Short Phillip’s Head screwdriver – $3.99 (Sears)
- Multipurpose/Multisurface Fabric Adhesive – $3.99 (Michael’s)
That’s it. That’s a total of $140.37, if you have to buy each of these things.
Now, take into account that the trim shop’s quote did not include parts. This means that they would have charged me approximately $495.40 to repair this issue. So, by doing this yourself, you can save in the neighborhood of $355.03! I call that worth it, especially considering the relatively small degree of skill required!
The Repair:
The most difficult part of this entire repair process was jockeying the top around to allow access to the innards of the passenger’s side convertible top. I was in the back seat for some of the repair, on the outside of the car for some of the repair and in the passenger’s seat for some of the repair. As long as you can accept this upfront, you will have no problems with the repair. For most of the repair, the top was about half-way up/down. One other note: do not attempt this repair without adequate light.
I estimate most people will be able to complete this in about the same time it took me: ~2 hours. Having done it once already, I am positive that I could now do it in less than 1 hour. Part of the reason it took me so long was because I hooked the assembly up backwards on the first try. On the second try, I did not thread the strings appropriately. Third time was a charm! Plus, I was taking pictures and mental notes through the process so I would be able to write this DIY article.
Now, let’s get our hands dirty.
1) Open the BMW parts box you received from www.getbmwparts.com:
PA200267.JPG

2) Inside, you will find two triangular-shaped plastic pieces with strings attached to the rear. There will also be a covered strip of adhesive on the inner side of each plastic piece. One of these is for the passenger’s side and one is for the driver’s side:
PA200268.JPG

3) Take the pieces out of the box and determine which piece is for which side. The strings will point towards the rear of the vehicle and the adhesive strip will always be closest to the center of the vehicle. Grab whichever piece is needed and place the other one back in the box (NOTE: The piece used for this repair is on the left in the picture below)
PA200269.JPG

4) Put the top in a half-open, half-closed position.
5) For reference, examine the non-damaged side of the convertible top with it half-way down (this allows the flap to hang loose from the convertible top frame). This was extremely helpful for me. Please remember that you will be reversing the way it is hooked up on the non-damaged side. The following pictures are all of my driver’s side, which was not damaged. You will see the arrangement of connection to the convertible top frame and :
(Note the 3 string attachment points on the plastic flap)
PA200270.JPG

(The single top string goes through 1 hoop, then is screwed into the convertible top; the connected string piece with the spring goes through 2 hoops, is screwed into the rear plate of the top with the spring retainer, then goes through 1 additional hoop before reattaching to the plastic flap)
PA200272.JPG

(This is an excellent picture of the top-most single string’s attachment points)
PA200273.JPG

(Here, you can see the string loop, it’s various connection points and the location for the spring retainer; the order and placement of each string is important; do not go over or under a metal part of the convertible top unless the non-damaged side shows it being there)
PA200274.JPG

6) For me, the first thing was to remove the broken top-most string connection point. This is done with the Torx T20 screw driver.
PA200275.JPG

PA200276.JPG


7) Remove the various connection points for the bottom string loop. In the following picture you can see the 3 connection points for the loop. Now you understand why I said you need a VERY SHORT Torx T20 screwdriver. I have decently large hands and this was some tight maneuvering.
PA200277.JPG

icon_cool.gif
Remove the nylon loop that supports the bottom string loop. For me, this took QUITE a lot of torque to do:
PA200282.JPG

9) After removing the 3 connection points on the metal frame and the nylon loop, you will only have that plastic piece connected by the rear spring retainer on the top’s passenger’s side rear plate. Once you have removed the rear spring retainer, you can remove the plastic piece from the vehicle entirely:
PA200278.JPG

10) Place the new plastic flap’s spring retainer over the hole in the rear top plate and screw it in:
PA200281.JPG

11) Place the top part of the plastic piece in the pocket in the fabric and pull the top string through the hole:
PA200270.JPG

12) Place the top part of the string loop inside the detached nylon loop and reconnect it to the metal frame:
PA200282.JPG

13) Reconnect each of the hoops to the metal top frame (NOTE: This should cause the spring retainer to be put under slight tension):
PA200277.JPG

14) Thread the top string through the connection point on the metal top frame and reconnect it at its original location. After this step, you should be looking at a fully connected plastic flap. I closed the top slowly to ensure I had it hooked up correctly and that it sat flush against the frame when the top closed:
PA200275.JPG

15) Remove the adhesive strip on the plastic flap. Place the fabric on the adhesive strip to hold it in place temporarily while you glue. Make sure to line up the edges of the fabric with the ridge on the rear of the flap as shown in this picture:
PA200275.JPG

16) Use the fabric adhesive sparingly to attach the fabric to the plastic along the ridge on the rear of the plastic flap. The corner of the fabric is cut so that it will fit the round corner of the plastic flap perfectly. Take your time with this step as this will determine how perfect the fabric will look when the top is up. After the adhesive is applied and the fabric is aligned with the plastic ridge on the plastic flap, let it sit without completely closing the top for 30 minutes.
17) Close the top completely. Crack the windows and let the vehicle sit open for approximately 6 hours, making sure that it is well-ventilated. The fabric adhesive is very smelly and we don’t want that smell in our interior. Do not open the top for at least 24 hours. It should look like this now!
18) After 24 hours dry time, put the top up and down at least once. Verify that the piece sits flush against the metal frame and the fabric looks perfect. That’s it! You’re done. You just did about $500 worth of work for $140!! Take the wife to dinner to celebrate…
Annoyances During Repair:
Here’s a brief listing of the annoyances I encountered during this repair:
- 1) Jockeying the top position numerous times
- 2) Moving to different positions in/out of the vehicle to gain access to various parts of the metal top frame
- 3) Convertible top hydraulics sank at one point and got top stuck on two plastic pieces jutting out from top compartment cover; fixed by gently pulling back on the convertible top compartment and pulling up on the bottom part of the top, while wife pushed top-down button
- 4) Hooking up connection points for string loop incorrectly
- 5) Not threading string loop piece through nylon loop
Conclusion:
All in all, this repair was rather uneventful. If this repair is approached with patience, it can be done by just about anyone.
Source: E46Fanatics.com
 
Second prototype BMW iphone holder for DICE

RM5 from DAISO - Publika
RM5 Clear Plastic glue


RM 650 special price from BA
RM30 BMW Brake Fluid DOT 4
RM 50 Friendship price for workmanship at Ah Lai (Kuchai Lama)
 
Early May I saw some oil leaks hence sending it to BOMIN


2vj1vzq.jpg


2iazklw.jpg


002dr9.jpg


1684295_120414083521_003.jpg


My new gear selector seal is leaking as the nut which secured it came loose.
pic16.JPG


That's the caused of the leak of ATF fluid


Total chargers is RM350 where workmanship is RM120

If I to DIY it may just cost me RM 80 but was very lazy plus John did a good job


On last Thursday my engine coil #2 misfiring badly, restart engine and it back to normal but after 10 km or so it came back. I assumed it was the ignition coil so , when home to clear the error code with INPA and it run smoothly for a day it start to misfire again when am stuck at LDP traffic jam due to UBAH gathering at Kelana Stadium. It is when the gearbox light came up and I start to panic, however I managed to bring the car home slowly. I cant do much to the car as am flying to Miri the next day.

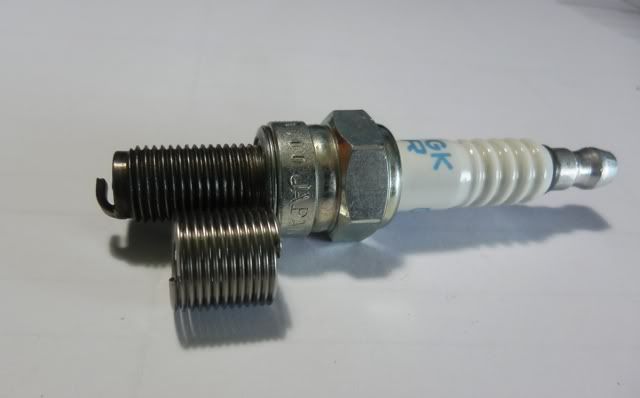
Yesterday I drop-by to BA to get an ignition coil BOSCH RM80 then to see John at BOMIN AUTO for help. Found out my #2 plug is cracked and #3 is stuck. Glad that he managed to removed the plug #3 however the plug socket thread is worn, its a normal issue should the mech over tighten the plug. PLEASE TIGHTEN YOUR PLUG TO HAND TIGHT ONLY and do it while the engine is cool never during its hot.


I do have 3 options

1. Take the opportunity to do a top overhaul and change the aging valve seals even-though its still ok. RM833 (Parts) + RM200( plug socket rethread) workmanship RM850. Will supply my own engine oil, plugs, filters and valve seals

2. Just retread the plug socket with heli coil

3. Sell my car and get Harley Davidson Iron 883 LOL!!!


I when for option #2 due to budget and its a recommendation by XXX and Ah Lai from Kuchai Lama

HeliCoilLength.jpg


images_44091_DHCK-UNF.jpg

[video=youtube;R-Ldl4QZeY8]http://www.youtube.com/watch?v=R-Ldl4QZeY8[/video]


replaced all my inferior quality BOSCH (Made in Germany) plugs with these Made in Japan BMW Plugs RM40 each

Did the retread at Ah Lai RM200 for the job


Uploaded with ImageShack.us
 
wp_64116923204_final_stage_blower_resistor_E39_5_s  eries_M5_bmw_OEM_part.jpg

[video=youtube;tvVsftVT-BM]http://www.youtube.com/watch?v=tvVsftVT-BM&hl=en-GB&gl=SG[/video]

RM155 from Bavarian Auto Segambut

Will DIY soon.

2013-02-08141938_zps9143c7a3.jpg

[video=youtube;6wiKMrvchtc]http://www.youtube.com/watch?v=6wiKMrvchtc[/video]

FEBI Germany RM75 from Bavarian Auto
 
Strider74;822869 said:
Bro AS, did you manage to solve the water leaking thru the expansion tank's cap?

I hope so after replaced the expansion tank back plate rm120 and aux thermostat valve rm130 . Fingers crossed all goes well for tomorrow ride
 
ty4y5y6y.jpg
ygyru5yd.jpg
nybare5u.jpg
ha5y8u6a.jpg
uhujyset.jpg


Few updates for my baby since I experiencing coolant leaks from expansion cap even it's new. Got the cap, aux thermostat, backplate and flush n refill the coolant.
 
Volvos525i;825177 said:
Hi bro AS...
did the coolant leak solved by now...

Nope ... It still spill coolant if I rempit and temp passed 110 or reached 112. I almost gave up but every mech said its normal as long the temperature needle is at 12 o'clock
 
anaksarawak;825207 said:
Nope ... It still spill coolant if I rempit and temp passed 110 or reached 112. I almost gave up but every mech said its normal as long the temperature needle is at 12 o'clock

Ok then fine hehehe...
But mine no spill but the level drop by 1 tea cup after 2-3 days...
But during long distance drive back hometown Shah Alam-Pekan 330km the level maintain...
This confius me sometimes...
Pressure test done no leak suspect the inlet pipe & water pipe below the inlet manifold...
My needle stay at 12 o'clock onboard range 85C-95C...
 
Volvos525i. .. in that case why not have your engine bay cleaned and after 7 days try look for coolant stain, if none it might be head gasket. . Sakit tu if that rosak.
 
anaksarawak;825219 said:
Volvos525i. .. in that case why not have your engine bay cleaned and after 7 days try look for coolant stain, if none it might be head gasket. . Sakit tu if that rosak.

Well have done that and no stains in eng bay...
Suspect the inlet n water pipe belom the inlet manifold...
Parts already bought only need to replace it when back in Shah Alam...
Any way thanks for the advice bro AS...
 
Was very irritated with grinding noise from my front brake, was told my textar pads r not ori but another mech try jet air clean the dust. Noise stopped but returned after 50km. Knowingly it's the dust so I when to ace hardware to get a can of brake cleaner. Results is amazing as it's totally quiet now. RM18
rynujahy.jpg


The noice returned after 100km so when to try zender at segambut next to goodyear n proton. Swap my pads from left to right and cleaned it.

Place is quiet so job is done fast but I think charging rm60 for that simple job is expensive

Here my pads look like
9yja5ydu.jpg


Rotor also look good
y4ysubyr.jpg
 
Its an expensive month for me

Paid near to RM1525 for the following (water hoses by BMW) as preventive maintenance
zumupydu.jpg


Replacement done at Hoo Huat @ Segambut RM80

I also did an oil change and ATF filter, gasket and oil change RM80

Petro Canada DEXVI 5 liters RM175, gasket (victor reinz) metal RM108, Filter OEM RM55

If I know BA sell GM6 I would have use that for my gearbox


Then I have a new issue... cyl 1 misfire but due to wet plug. Found out #1 and #4 are wet. I have replaced the socket o ring earlier this year with iceduke's help and now its leaking? ??????

Also found out my ignition coil #3 is weak and my new set of BMW plug #3 is burnt
masamy8a.jpg

The pic let you compare with plug at cyl #4

WP Albert charged me RM188 for new coil n workmanship. . I think its pricy even he is good.

namatu9e.jpg


Was advised by many sifu that is best to do a top overhaul if I want a optimal performance from my car. So when to purchased the Top Overhaul repair kit from BA inclusive of Vector Reinz bolts RM730

Now negotiating for workmanship, found Hoo Huat at Segambut next to Goodyear a BMW sifu willing to do for RM600
 
Bro AS...
Any updates regarding your spark plug tread...
Hope you have settle that issue since the head is taken off the block...
 
Top Bottom